QUICK TAPE® Instructions
Applying the QUICK TAPE® support strap is quick and easy! Watch the video and read all instructions carefully before applying for maximum benefit.
Important note on ordering the right QUICK TAPE® support straps for you
To be certain that you are ordering the correct size, please measure the circumference of your bare forefoot about 1” below where your ankle connects to the top of your foot.
- QUICK TAPE® STANDARD strap will fit a circumference of 7.5” to 10”
- QUICK TAPE® LARGE strap will fit a circumference fo 10” to 11.5”
As the QUICK TAPE® support strap starts working to help align your foot, it may feel as if it is getting looser. Though it may feel strange, this is perfectly normal, and the strap is still effectively supporting your foot.
STEP ONE
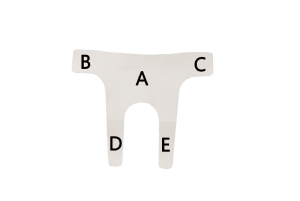
Make sure your foot and hands are clean and dry, no lotions, creams, oils or powders. Shave any hair from the top of the foot. While seated, place Quick Tape cloth-side down on a clean hard surface. Sections D and E should be pointed toward you. You can use your toes to secure tabs B and C, so your hands are free to peel off sections A, D, and E.
STEP TWO
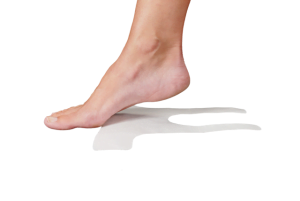
Place the ball of your foot in front of section A with your heel lifted. Keeping your foot centered between sections B and C, slide the strap forward until it stops just behind the big toe knuckle and small toe knuckle (The 1st and 5th metatarsal heads).
STEP THREE
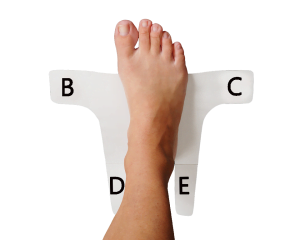
Set your heel down between heel tabs D and E. Remove backing from section B and C.
STEP FOUR
While stepping down on section A, wrap sections B and C straight across the top of the foot (one overlapping the other). Do not stretch or angle these sections. Rub over the top and sides of these tabs vigorously to activate the adhesive.
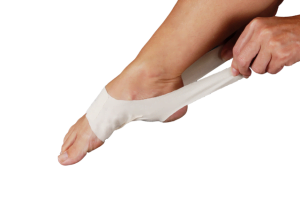
STEP FIVE
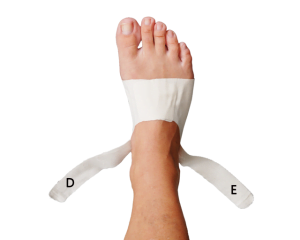
Lift your foot off the floor and point your toes. While pulling back gently on sections D and E, wrap sections D and E around the back of the heel bone, with one overlapping the other. Do not wrap any higher than the heel bone to avoid interfering with the Achilles tendon.

STEP SIX
It is important to activate the adhesive by firmly rubbing the entire strap vigorously for 10 to 15 seconds for best adhesion. If applied correctly, pain should be absent or significantly reduced.
Each QUICK TAPE® support strap lasts up to 7 days depending on body type, humidity and activity level. Just pat dry after showering and wear it with any footwear. Long baths, hot tubs, swimming, excessive sweating, and high humidity climates may shorten the effective life of the strap.
Once application is complete, QUICK TAPE® will feel very snug on your foot. As QUICK TAPE® holds your arch and helps to align your foot, it will start to feel looser as your foot adapts and conforms. It is very normal for you to think that QUICK TAPE® is now too loose and no longer working, but DO NOT REMOVE IT. QUICK TAPE® is still working to hold your arch up naturally by pulling the ball and heel of your foot together. This is what gives the fascia ligament the slack it needs to start the healing process.
Additionally, during the course of the day, your foot can swell several times from use, heat and humidity. Because of this, QUICK TAPE® will feel tighter or looser at different times during the day. Again, please do not remove Quick Tape® for several days unless it actually detaches from your foot or slips back too far from the forefoot area. Since every person has a different body and skin type, the length of time that you can wear Quick Tape® will depend on these factors. Quick Tape® has the highest quality, medical-grade, latex free, hypoallergenic skin adhesive for best comfort and optimum results.
For plantar fasciitis, QUICK TAPE® support straps should be worn 24/7 for six to eight weeks or as your doctor recommends. QUICK TAPE® support straps may also be worn as a preventative measure to protect your feet from injury while participating in activities such as marathons, sports, heavy lifting, and prolonged periods of walking or standing.
Still have questions? Check out our FAQ page!